Installation de Minetest 0.4.15 + Raspberryjammod 0.20 + Blocky 201612 sous Raspberry Pi 4
Distribution de travail :
Distributor ID: Raspbian
Description:    Raspbian GNU/Linux 8.0 (jessie)
Release:        8.0
Codename:       jessie
Liens :
https://atelier.hacktech.dev/installation-du-client-minetest-stable-0-4-15-sur-raspberry-pi-3/
https://atelier.hacktech.dev/minetest-installation-de-raspberryjammod-python/
https://atelier.hacktech.dev/compilation-de-blockly-sous-ubuntu-17-10/
https://atelier.hacktech.dev/minetest-programmation-par-bloc-blockly/
I/ Installation de Minetest.
1/ Installation des paquets de développement.
pi@doomquake:~ $ sudo apt-get install build-essential git-core cmake libirrlicht-dev cmake libbz2-dev libpng-dev libjpeg-dev libxxf86vm-dev libgl1-mesa-dev libsqlite3-dev libcurl4-gnutls-dev libfreetype6-dev zlib1g-dev libgmp-dev libjsoncpp-dev libluajit-5.1-2 libluajit-5.1-dev libncurses5-dev doxygen gettext-base libgettextpo-dev libopenal-dev libvorbis-dev gettext libleveldb-dev postgresql postgresql-server-dev2/ Création du répertoire de travail.
pi@doomquake:~ $ mkdir -p JEUX/MINETEST.415
pi@doomquake:~ $ cd JEUX/MINETEST.415/
pi@doomquake:~/JEUX/MINETEST.415 $
3/ Téléchargement du moteur Minetest.
pi@doomquake:~/JEUX/MINETEST.415 $ wget https://github.com/minetest/minetest/archive/refs/tags/0.4.15.tar.gz
pi@doomquake:~/JEUX/MINETEST.415 $ mv 0.4.15.tar.gz minetest_0.4.15.tar.gz
pi@doomquake:~/JEUX/MINETEST.415 $ tar xvfz minetest_0.4.15.tar.gz
4/ Téléchargement du jeu Minetest.
pi@doomquake:~/JEUX/MINETEST.415 $ wget https://github.com/minetest/minetest_game/archive/refs/tags/0.4.15.tar.gz
pi@doomquake:~/JEUX/MINETEST.415 $ mv 0.4.15.tar.gz minetest_game_0.4.15.tar.gz
pi@doomquake:~/JEUX/MINETEST.415 $ tar xvfz minetest_game_0.4.15.tar.gz
pi@doomquake:~/JEUX/MINETEST.415 $ mv minetest-0.4.15 minetest
pi@doomquake:~/JEUX/MINETEST.415 $ cd minetest5/ Configuration de la compilation.
pi@doomquake:~/JEUX/MINETEST.415/minetest $ cmake . -DRUN_IN_PLACE=TRUE -DBUILD_SERVER=TRUE -DENABLE_LUAJIT=TRUE -DENABLE_FREETYPE=TRUE -DENABLE_GETTEXT=TRUE -DENABLE_CURL=TRUE -DENABLE_GLES=TRUE -DCMAKE_BUILD_TYPE=Release6/ Compilation.
pi@doomquake:~/JEUX/MINETEST.415/minetest $ make -j2pi@doomquake:~/JEUX/MINETEST.415/minetest $ cd games/
pi@doomquake:~/JEUX/MINETEST.415/minetest/games $ 7/ Installation du jeu Minetest.
pi@doomquake:~/JEUX/MINETEST.415/minetest/games $ ln -s ../../minetest_game_0.4.15 minetest_game
pi@doomquake:~/JEUX/MINETEST.415/minetest/games $ cd ..
8/ Lancement du client Minetest.
pi@doomquake:~/JEUX/MINETEST.415/minetest $ cd bin/
pi@doomquake:~/JEUX/MINETEST.415/minetest/bin $ ./minetest
II/ Installation de RaspberryJamMod Minetest.
1/ Installation des paquets de développement LUA pour le réseau.
pi@doomquake:~/JEUX/MINETEST.415 $ sudo apt-get install lua-sec lua-socket lua-socket-dev2/ Téléchargement du mod.
pi@doomquake:~/JEUX/MINETEST.415 $ wget https://github.com/arpruss/raspberryjammod-minetest/archive/0.20.tar.gz
pi@doomquake:~/JEUX/MINETEST.415 $ tar xvfz 0.20.tar.gz
3/ Installation.
pi@doomquake:~/JEUX/MINETEST.415 $ cd minetest/mods/
pi@doomquake:~/JEUX/MINETEST.415/minetest/mods $
pi@doomquake:~/JEUX/MINETEST.415/minetest/mods $ ln -s ../../raspberryjammod-minetest-0.20/raspberryjammod
pi@doomquake:~/JEUX/MINETEST.415/minetest/mods $ cd ..
pi@doomquake:~/JEUX/MINETEST.415/minetest $ 4/ Configuration.
pi@doomquake:~/JEUX/MINETEST.415/minetest $ cp games/minetest_game/minetest.conf.example games/minetest_game/minetest.confOuvrir :
~/JEUX/MINETEST.415/minetest/games/minetest_game/minetest.confChercher :
#creative_mode = falseRemplacer par :
creative_mode = true
secure.enable_security = false
secure.trusted_mods = raspberryjammod
Ouvrir :
mods/raspberryjammod/init.luaChercher :
if minetest.request_insecure_environment then
   ie = minetest.request_insecure_environment()
else
   ie = _G
end
Remplacer par :
ie = _G5/ Activation du mod dans le client Minetest.
En 'Singleplayer', créer un monde 'plat',nommé 'plat', via le générateur de monde 'flat'.
[Configurer] ce monde en activant le mod 'raspberryjammod'.
6/ Créer un script de création de block.
Ouvrir :
mods/raspberryjammod/mcpipy/pillar.pyajouter :
#!/usr/bin/env python

import mcpi.minecraft as minecraft
import mcpi.block as block
import server
import math

# Connect to the Minecraft server
world = minecraft.Minecraft.create(server.address)

# Get the player's current position and store the coordinates
[x,y,z] = world.player.getPos()

# Set some variables to customize your pillar
height = 3
material = block.BRICK_BLOCK

# Build the pillar. It will be "height" blocks high and located one step away from the player.
for level in range(0, height):
    world.setBlock( x+1, y+level, z+1, material )
    level = level + 1;
Action:
pi@doomquake:~/JEUX/MINETEST.415/minetest/mods/raspberryjammod/mcpipy $ chmod +x pillar.py 7/ Lancer le serveur Minetest.
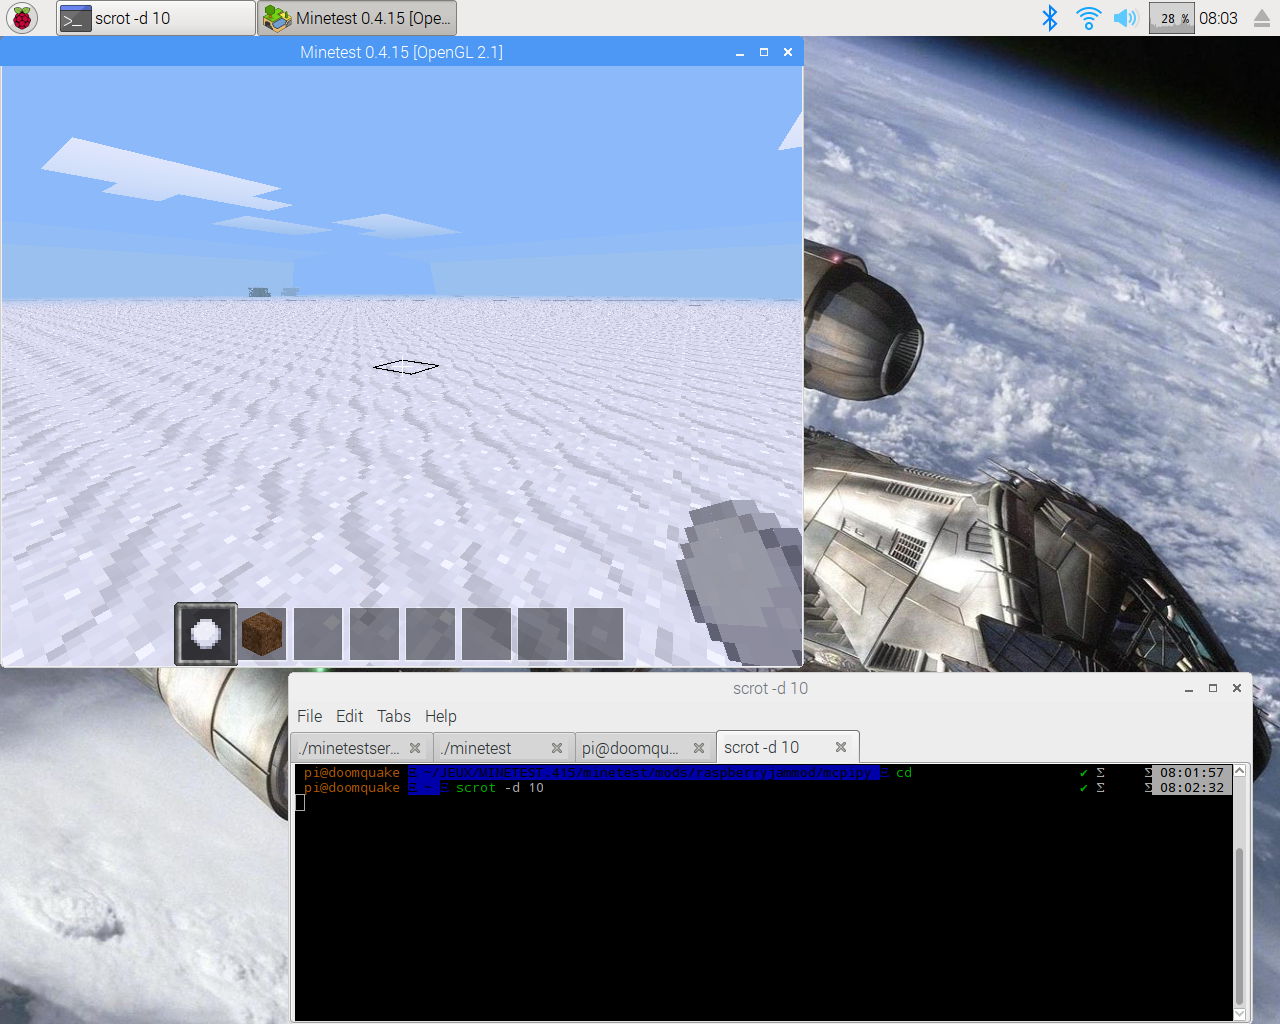
pi@doomquake:~/JEUX/MINETEST.415/minetest/bin $ ./minetestserver 8/ Lancer le client Minetest.
pi@doomquake:~/JEUX/MINETEST.415/minetest/bin $ ./minetestSe connecter au serveur Minetest.
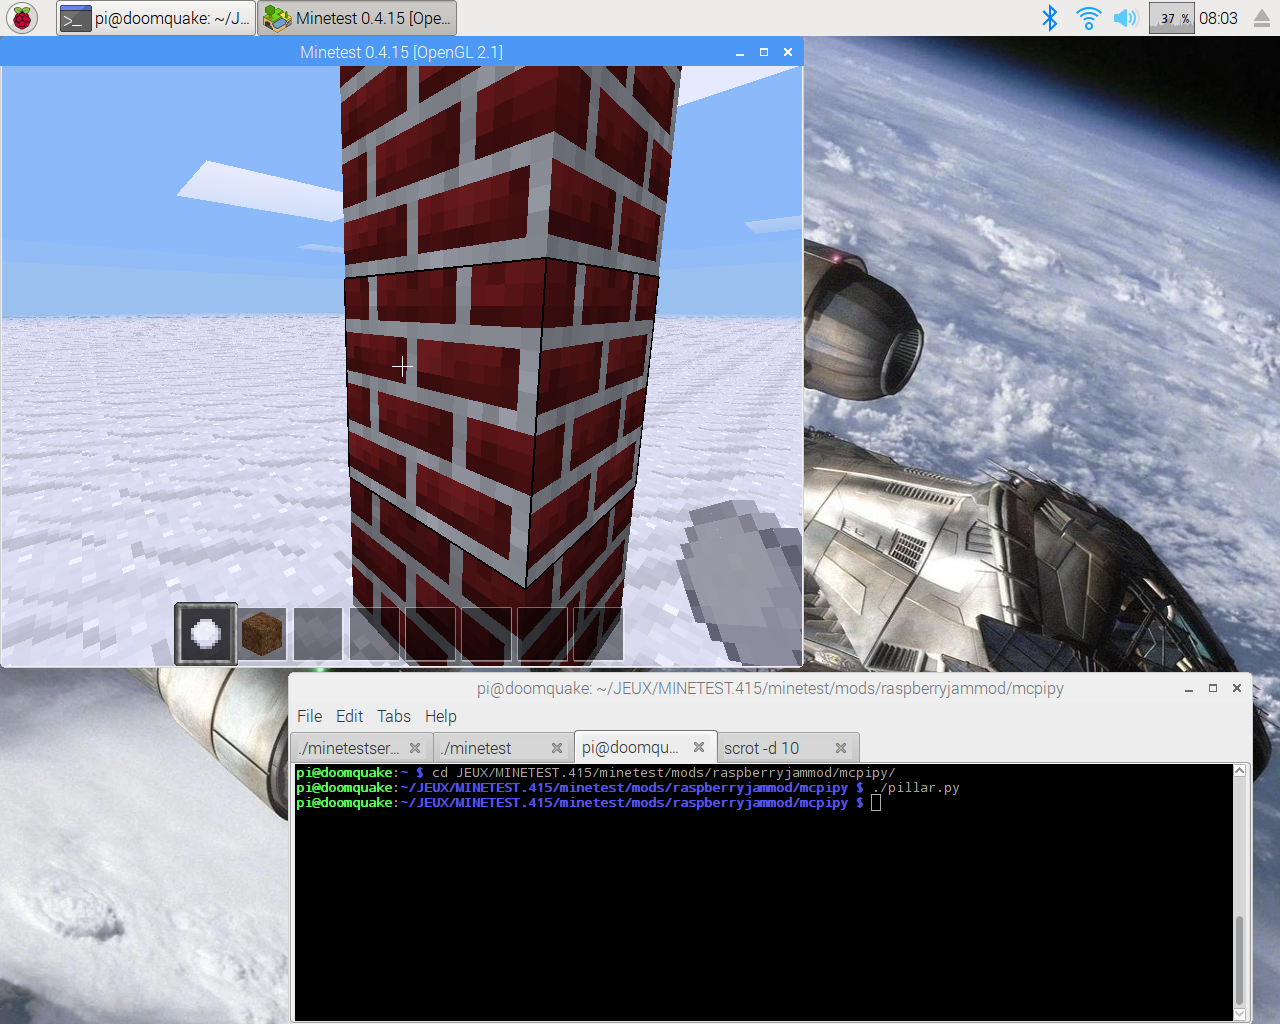
9/ Lancer le script Python.
pi@doomquake:~/JEUX/MINETEST.415/minetest/mods/raspberryjammod/mcpipy $ ./pillar.py Avant :
Après l'exécution du script :
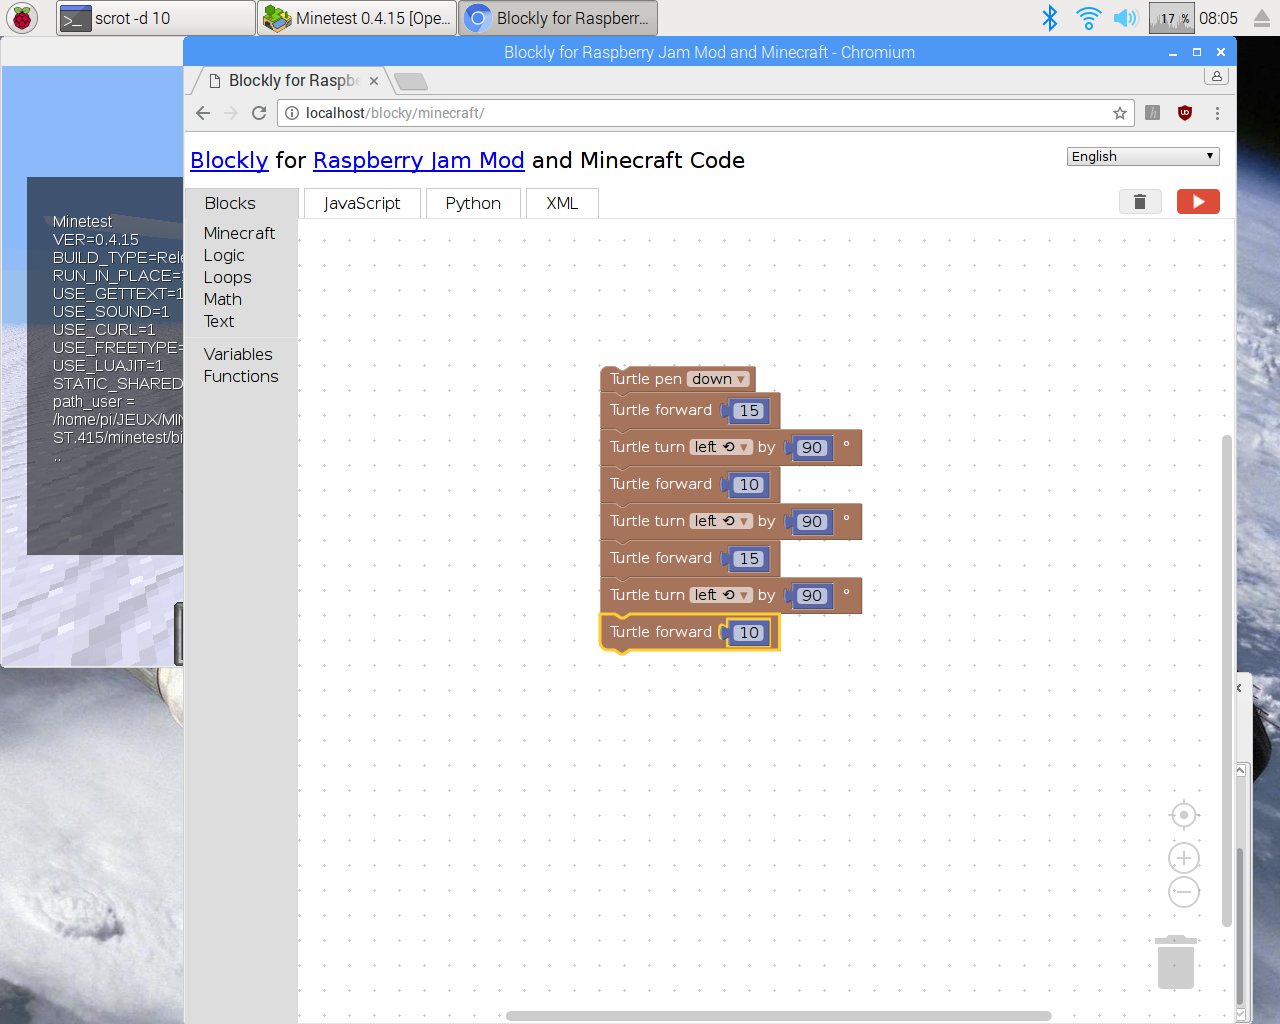
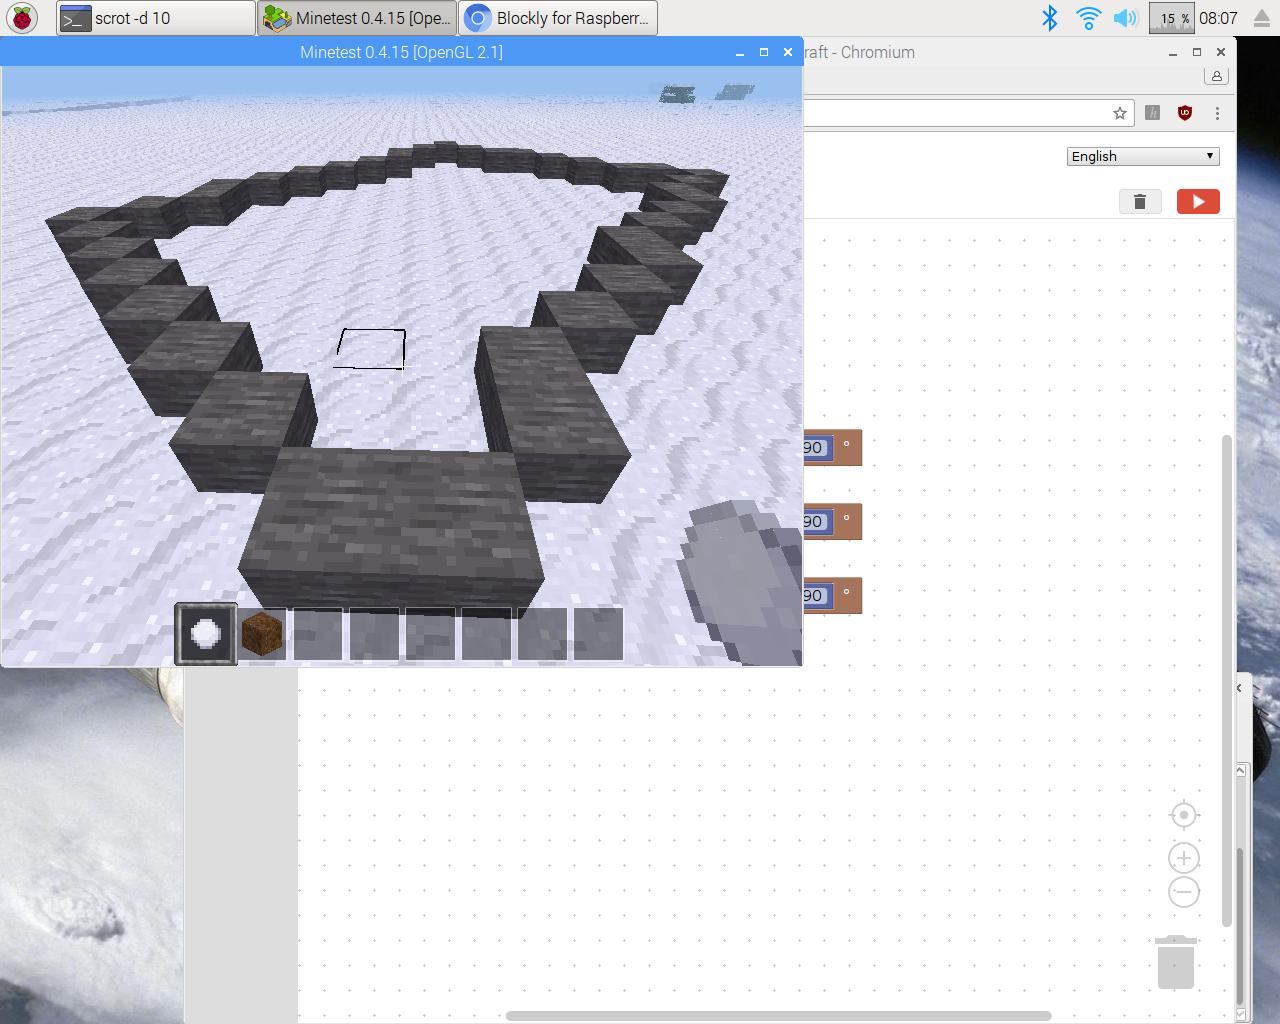
III/ Installation de Blocky.
1/ Installation du serveur web Apache.
pi@doomquake:~ $ sudo apt-get install apache2pi@doomquake:~ $ cd JEUX/MINETEST.415/
pi@doomquake:~/JEUX/MINETEST.415 $ 2/ Téléchargement de Google Closure Library de décembre 2016.
pi@doomquake:~/JEUX/MINETEST.415 $ wget https://github.com/google/closure-library/archive/refs/tags/v20161201.tar.gz
pi@doomquake:~/JEUX/MINETEST.415 $ tar xvfz v20161201.tar.gz
pi@doomquake:~/JEUX/MINETEST.415 $ mv closure-library-20161201/ closure-library
4/ Téléchargement de Blocky pour Minecraft.
pi@doomquake:~/JEUX/MINETEST.415 $ wget https://github.com/arpruss/blockly-minecraft/archive/refs/heads/master.zip
pi@doomquake:~/JEUX/MINETEST.415 $ cd blockly-minecraft-master/
pi@doomquake:~/JEUX/MINETEST.415/blockly-minecraft-master $
5/ Compilation.
pi@doomquake:~/JEUX/MINETEST.415/blockly-minecraft-master $ ./build.py
SUCCESS: msg/js/tr.js
SUCCESS: msg/js/de.js
...
SUCCESS: msg/js/sc.js
Exception in thread Thread-2:
Traceback (most recent call last):
  File "/usr/lib/python2.7/threading.py", line 810, in __bootstrap_inner
    self.run()
  File "./build.py", line 162, in run
    self.gen_core()
  File "./build.py", line 193, in gen_core
    self.do_compile(params, target_filename, filenames, "")
  File "./build.py", line 258, in do_compile
    json_data = json.loads(json_str)
  File "/usr/lib/python2.7/json/__init__.py", line 338, in loads
    return _default_decoder.decode(s)
  File "/usr/lib/python2.7/json/decoder.py", line 366, in decode
    obj, end = self.raw_decode(s, idx=_w(s, 0).end())
  File "/usr/lib/python2.7/json/decoder.py", line 384, in raw_decode
    raise ValueError("No JSON object could be decoded")
ValueError: No JSON object could be decoded

SUCCESS: blockly_uncompressed.js
pi@doomquake:~/JEUX/MINETEST.415/blockly-minecraft-master $
6/ Installation.
pi@doomquake:~/JEUX/MINETEST.415/blockly-minecraft-master $ cd /var/www/html/
pi@doomquake:/var/www/html $
pi@doomquake:/var/www/html $ sudo ln -s /home/pi/JEUX/MINETEST.415/blockly-minecraft-master/ blocky7/ Sous le navigateur Chromium, lancement de Blockly :
http://localhost/blockly/minecraft/